While testing the v12 version of the org.openntf.domino library I found a bug that stopped me from deploying it to v12.0.x Domino servers. I found out what the cause for the issue was, so I decided to take a shot at fixing it myself. There was just one problem: I didn’t have a development setup for OSGi plugins anymore. Online I could find most of the steps involved, but the guides could use an update here and there.
That’s what this post is about. It is mostly based on https://github.com/OpenNTF/XPagesExtensionLibrary/wiki/Development-Environment
The basics
Let’s start with the basics: I’m using Windows 10, although this will most like work with Windows 11. I’ve installed Domino 12.0.1 and Notes 12.0.1 locally.
- Install a Java SDK. I’ve used an OpenJDK version for Java 8 downloaded from https://adoptium.net/temurin/releases/?version=8
- Install Git. Use the command line or any Git client you prefer: SourceTree, GitKraken, Tower
- Install Maven. I installed the 3.8.6 version from https://maven.apache.org/download.cgi
- You’ll need to generate a Domino Update site that needs to be added to your Target Platform (I’ll convert that later). Clone it from https://github.com/OpenNTF/generate-domino-update-site. I’ve used the 4.2.1 version.
Add the OpenNTF Maven server to your Maven settings.xml file. Edit or create if in in C:\users\<your name\.m2 with these contents:
<?xml version="1.0"?>
<settings xmlns="http://maven.apache.org/SETTINGS/1.0.0"
xmlns:xsi="http://www.w3.org/2001/XMLSchema-instance"
xsi:schemaLocation="http://maven.apache.org/SETTINGS/1.0.0 http://maven.apache.org/xsd/settings-1.0.0.xsd">
<profiles>
<profile>
<id>openntf</id>
<pluginRepositories>
<pluginRepository>
<id>artifactory.openntf.org</id>
<name>artifactory.openntf.org</name>
<url>https://artifactory.openntf.org/openntf</url>
</pluginRepository>
</pluginRepositories>
</profile>
</profiles>
<activeProfiles>
<activeProfile>openntf</activeProfile>
</activeProfiles>
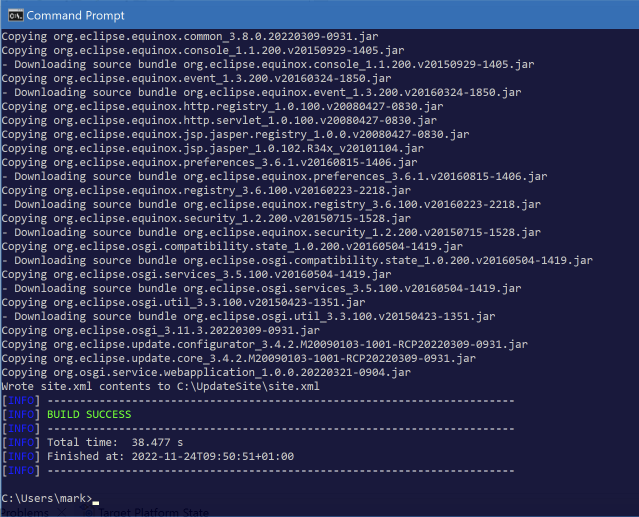
</settings>Open a terminal and go to the update site repo folder. It should have a file named pom.xml. Run the following command:
mvn installThis will install the dependencies.
Next run this command (from the same folder) to create a so called p2 repository:
mvn org.openntf.p2:generate-domino-update-site:generateUpdateSite -Dsrc="C:\IBM\Domino" -Ddest="C:\UpdateSite"Notice the 2 parameters:
-Dsrc = location of your local Domino install (mine is in c:\IBM\domino)
-Ddest = folder where the update site will be generated. Remember this: you’ll need it later.
If all goes well you’ll get a success message:
Eclipse configuration
Install Eclipse IDE for RCP and RAP Developers from https://www.eclipse.org/downloads/packages/release/2022-09/r/eclipse-ide-rcp-and-rap-developers. I’ve used the 2022-09 64bit version.
We’ll need to install 2 additional pieces of software in Eclipse.
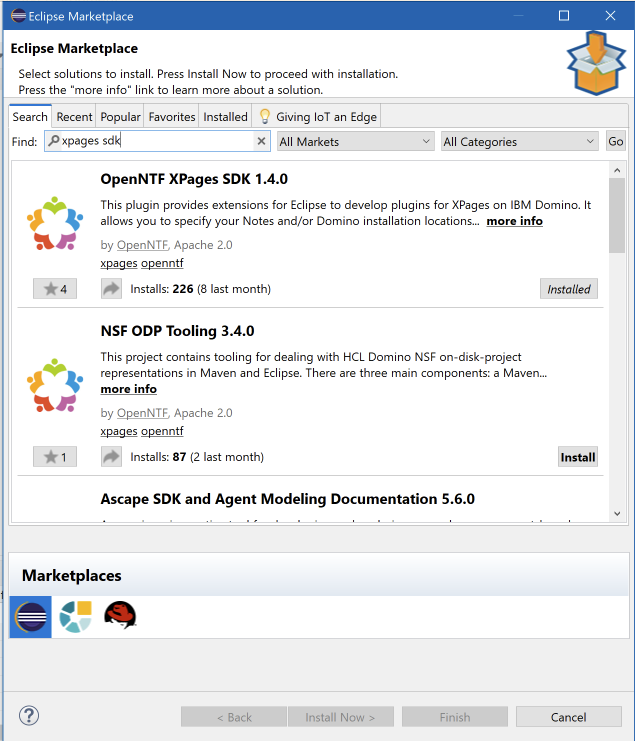
Start Eclipse and go to Help > Eclipe Marketplace. In the dialog search for “XPages” and install the XPages SDK plugin.
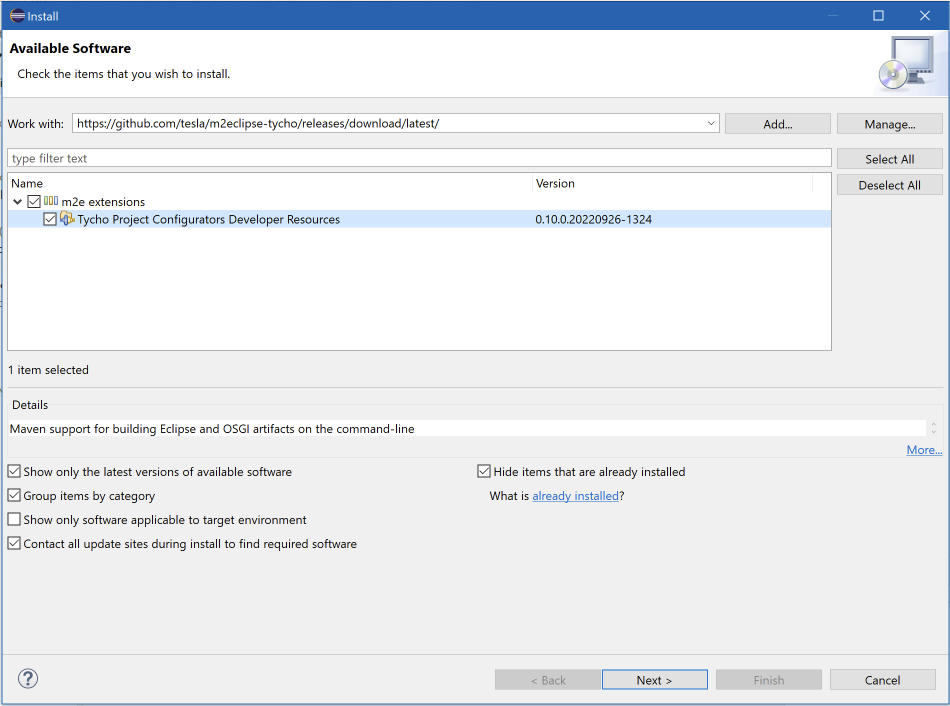
We’ll also need an updated Tycho version as well: in Eclipse go to Help > Install new software. In the ‘work with’ field enter the URL of the Github repo that contains the updated version: https://github.com/tesla/m2eclipse-tycho/releases/download/latest/. Expand the category and select the “Tycho Project Configurators” feature. Accept the license, install it and restart Eclipse.
Go to the Eclipse preferences.
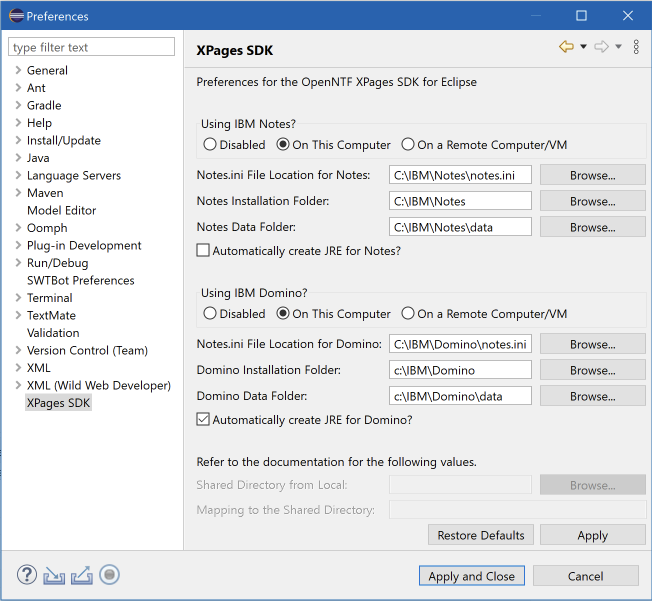
On the XPages SDK tab, check the paths of your local Domino & Notes install. Check “automatically create JRE for Domino”.
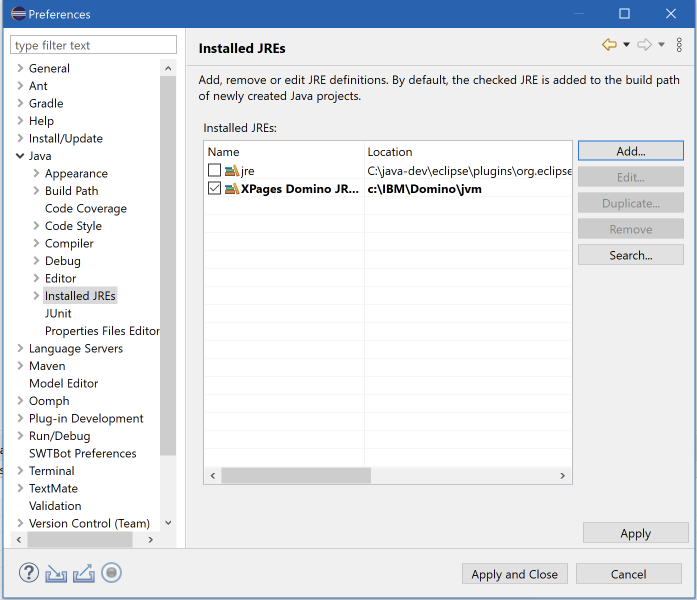
On the Java > Installed JRE screen, check if the new Domino JRE is selected. Eclipse will use this to compile code.
On the Plugin Development > Target Platform screen, there should be an entry that is checked and set to ‘Active’. The name doesn’t matter, but the locations do. If you select it you should see 3 locations in the bottom:
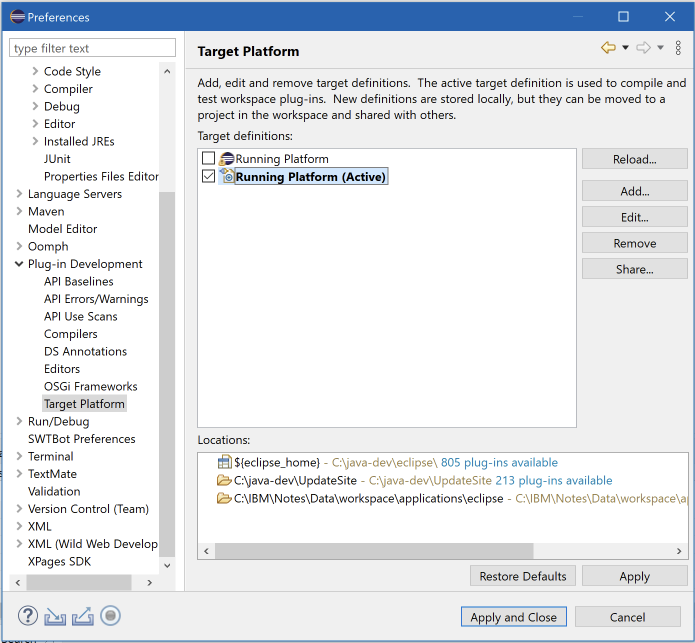
${eclipse_home} is added by Eclipse
C:\java-dev\UpdateSite is the folder where I created my p2 repository (see above)
C:\IBM\Notes\Data\workspace\applications\eclipse : folder in the local Notes install
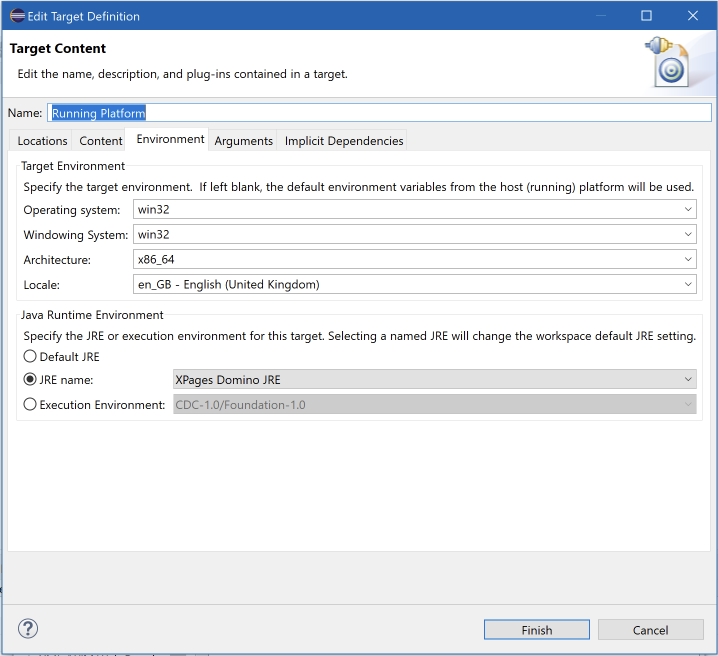
If you click ‘Edit’ you can add folders if any of the 3 above aren’t present. While you’re there, also make sure that on the Environment tab, the XPages Domino JRE is selected:
This completes my setup.
Next I created a fork from the org.openntf.domino repo in my Github account from https://github.com/OpenNTF/org.openntf.domino.git. I cloned the fork and switched to the latest commit for my Domino version (12.0.1). The project in Eclipse will show errors if the code is newer than your local Domino install (because that’s what the plugins in the p2 site is based on).
The projects in the cloned repo need to be imported into Eclipse. Click File > Import and choose Maven > Existing Maven Projects. Select the folder that contains the repo and import them into Eclipse.
Now you’re ready to debug the code. Click the Debug icon in Eclipse and select “Debug Configurations”. Select “OSGI Framework” in the left hand list and click “New run configuration” (new icon at the top). Give it a name (in the screenshot below it’s ‘oda’). The screen will look like this:
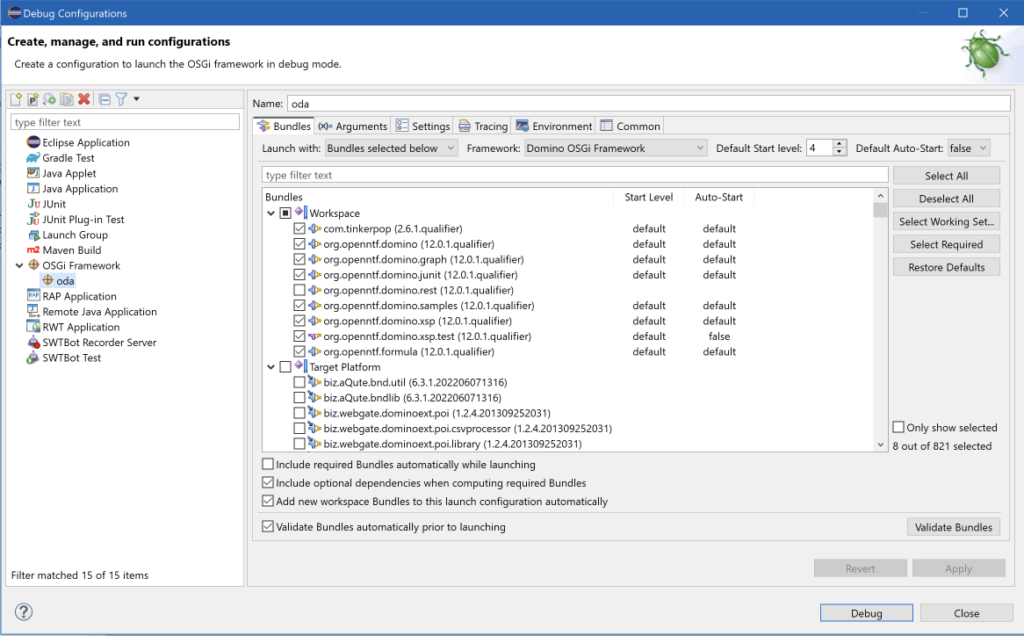
Make sure that:
- Default auto-start (top right) is set to false
- Framework is set to “Domino OSGi framework”
- In the bundles section, all items in the target platform are NOT selected, only the plugins from the Workspace are selected.
If you now click Debug, the XPages SDK will create a file named pde.launch.ini for you in your local Domino folder (<domino data>/domino/workspace). It will show you this dialog first:
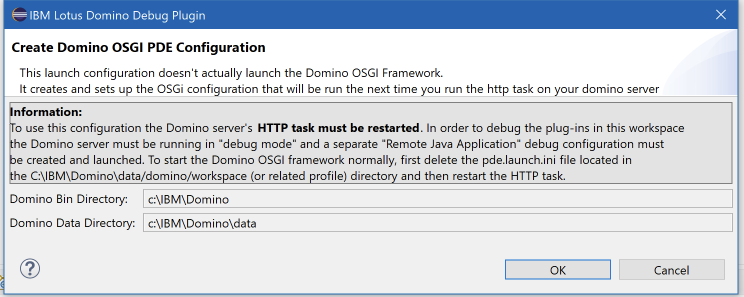
Click ‘Ok’ to generate the file. Restart the HTTP task on Domino and the plugins will be loaded from the repo/ Eclipse instead of the update site database). You can work with the plugin. When you’re done, simply delete the ‘pde.launch.ini’ file and restart the HTTP task.
Oh and in case you’re wondering: the pull request for the issue is ready and merged in the project!
 With the demos from
 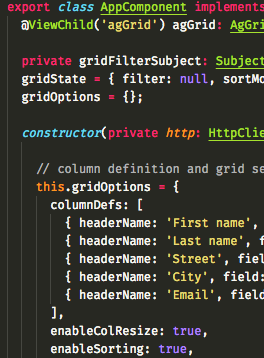 Most changes need to be made in the
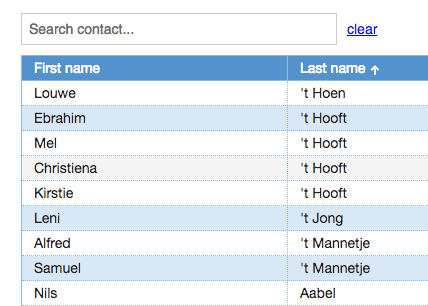
  Every web application I build includes lists (or as Domino people like to call them: views) in one form of another. And then users start asking question like “But can it do sorting?” “How about a search function (on just these fields?)” “And filtering?”. With <insert-you-favorite-framework-here> that’s not too hard on short lists. I’m an Angular guy and can easily give them sorting and filtering.
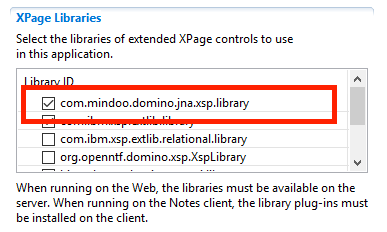
 So I wrote a couple of tests using the 3 APIs that traverse a view from the well known ‘Fakenames’ database. It is based on the Domino Name & Address book template and contains 40,000 documents. The tests will loop through a view called ‘People’ containing all the documents and will read a value from one of the columns.
 I was doing some work with an Angular application talking to the