 Over the past couple of weeks, Visual Studio Code has become my favorite editor. It has some great features, is fast and relatively easy to use. Of course I’m still learning how to use it most effectively. Here’s what I learned today.
Starting Visual Studio Code from the terminal
Visual Studio Code has a built-in function to add a shortcut to it in your OS X environment. That allows you to start it from a terminal. The procedure is described here and comes down to:
- Open Visual Studio Code
- Bring up the Command Palette ( Cmd – Ctrl – P ) and type “shell command”
- Execute the ‘Shell Command: Install ‘code’ command in PATH’ command
When you’ve done that, you can simply type ‘code‘ in your terminal to start Visual Studio Code. If you want to open a specific file with Code, type ‘code <filename>’.
Note: Windows users get this feature automatically when installing Code.
Open a file directly from a repo in SourceTree
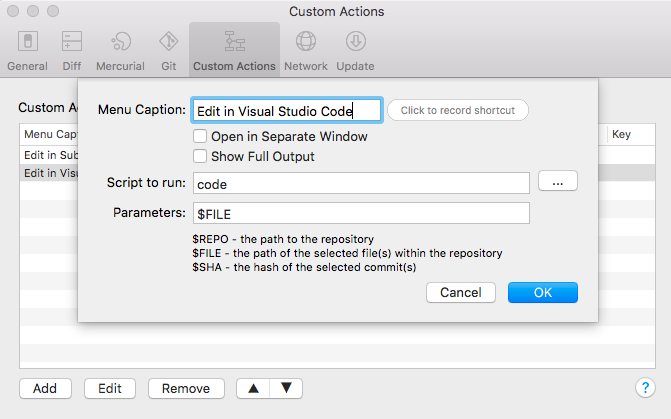
SourceTree has a function that allows you to define ‘Custom Actions’ that can be started from files in any repo. If you’ve added the ‘code’ command from the previous step, you can create a Custom Action to open any selected file with Visual Studio Code:
- Bring up the SourceTree preferences (Cmd + comma)
- Go to the Custom Actions tab and configure it like this (OS X users):

Note that Windows users need to configure the custom action with the full path to the Code executable:

If you now select a file in your repo, you can right click > Custom Actions > Edit in Visual Studio Code to immediately open a file with Code.
Happy coding!
I did a VS Code > SourceTree integration – https://marketplace.visualstudio.com/items?itemName=morrislaptop.vscode-open-in-sourcetree