HCL Domino Designer 14 or higher uses Java 17 (or higher in 14.5). Your Domino servers might not all be upgraded to version 14+ yet, and up to Domino 12 it uses Java 8. So that means that you’re developing code with Java 17 and running it on a lower version. In that situation you can run into NoSuchMethod errors if you use methods that don’t exist in Java 8.
The solution is to let Designer know that you’re running on Java 8, so it takes that into account when compiling your code. You can do that by enabling the –release option in the JDK:
When enabled it does two things when you compile your application:
Checks your source code for methods that don’t exist in Java 8 (and will show a compilation error when it finds them).
Builds the code to run on Java 8.
That second option is actually why I started looking into this in the first case: in my source code I was using the ByteBuffer class. The implementation of this class changed in Java 9 and it was throwing NoSuchMethod errors. More details about that can be read here.
While testing the v12 version of the org.openntf.domino library I found a bug that stopped me from deploying it to v12.0.x Domino servers. I found out what the cause for the issue was, so I decided to take a shot at fixing it myself. There was just one problem: I didn’t have a development setup for OSGi plugins anymore. Online I could find most of the steps involved, but the guides could use an update here and there.
Let’s start with the basics: I’m using Windows 10, although this will most like work with Windows 11. I’ve installed Domino 12.0.1 and Notes 12.0.1 locally.
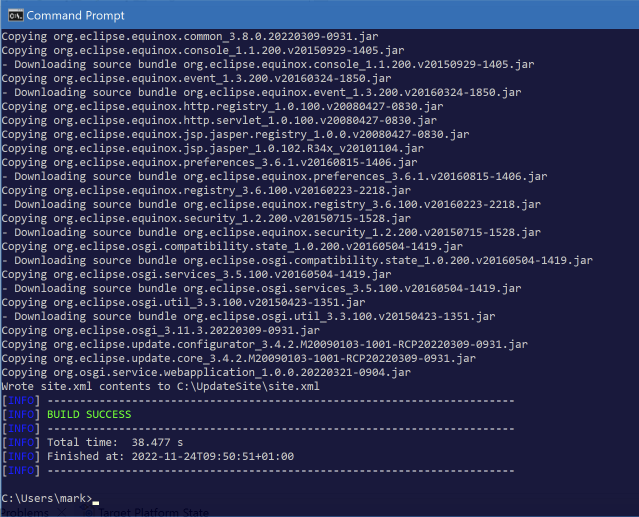
You’ll need to generate a Domino Update site that needs to be added to your Target Platform (I’ll convert that later). Clone it from https://github.com/OpenNTF/generate-domino-update-site. I’ve used the 4.2.1 version.
Add the OpenNTF Maven server to your Maven settings.xml file. Edit or create if in in C:\users\<your name\.m2 with these contents:
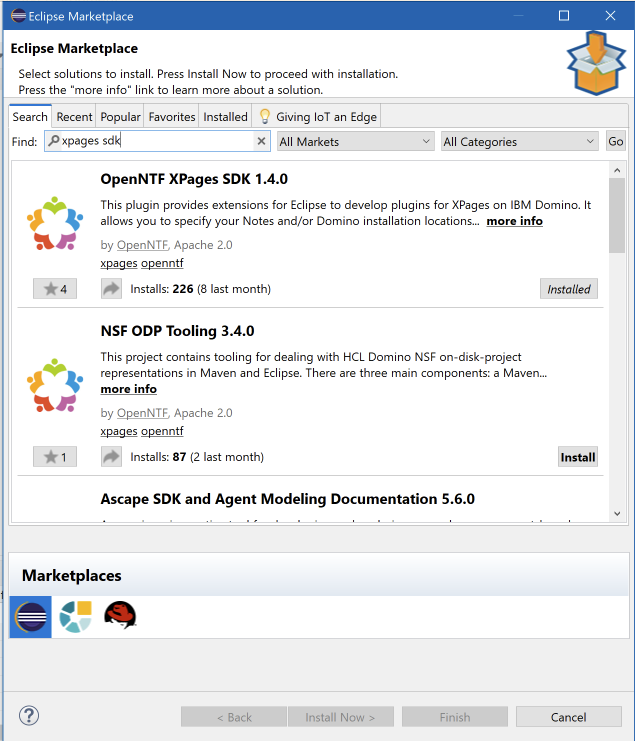
We’ll need to install 2 additional pieces of software in Eclipse. Start Eclipse and go to Help > Eclipe Marketplace. In the dialog search for “XPages” and install the XPages SDK plugin.
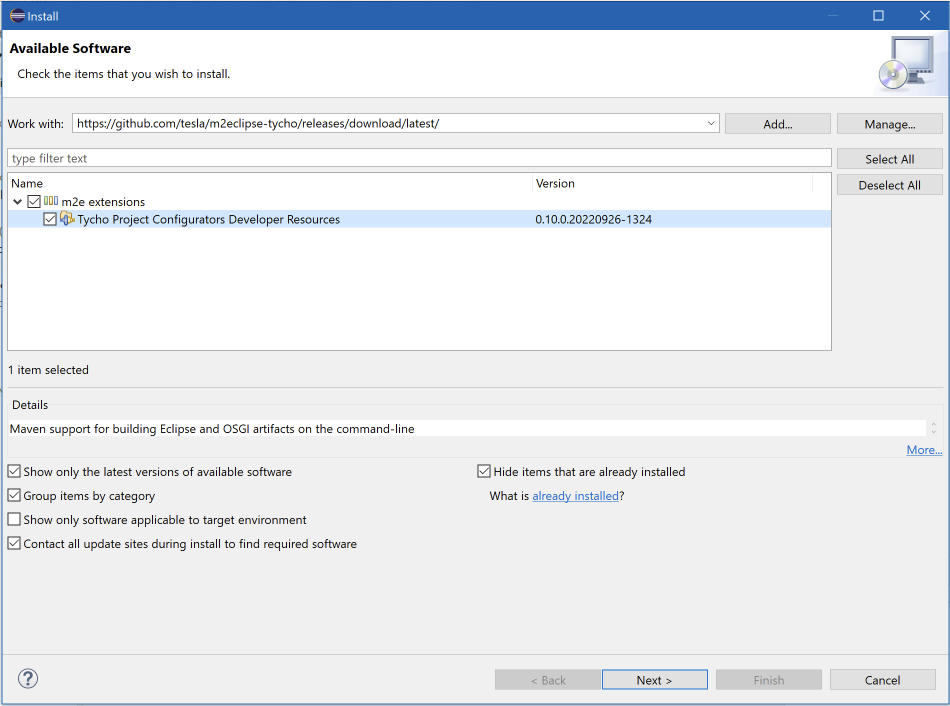
We’ll also need an updated Tycho version as well: in Eclipse go to Help > Install new software. In the ‘work with’ field enter the URL of the Github repo that contains the updated version: https://github.com/tesla/m2eclipse-tycho/releases/download/latest/. Expand the category and select the “Tycho Project Configurators” feature. Accept the license, install it and restart Eclipse.
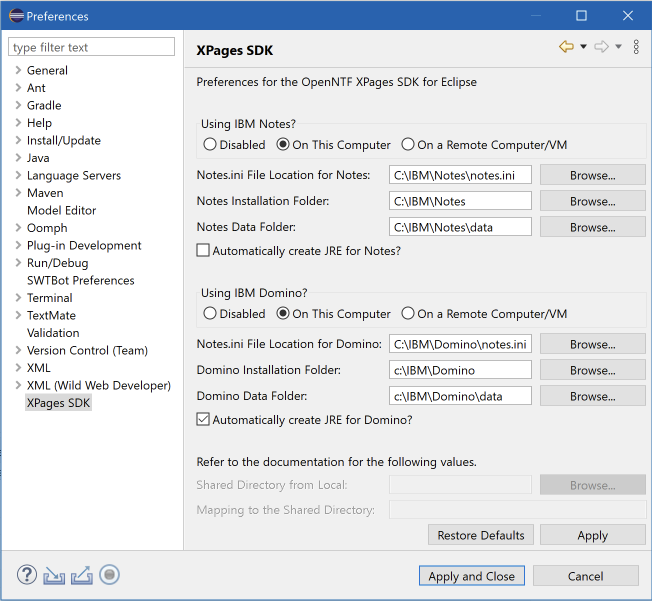
Go to the Eclipse preferences.
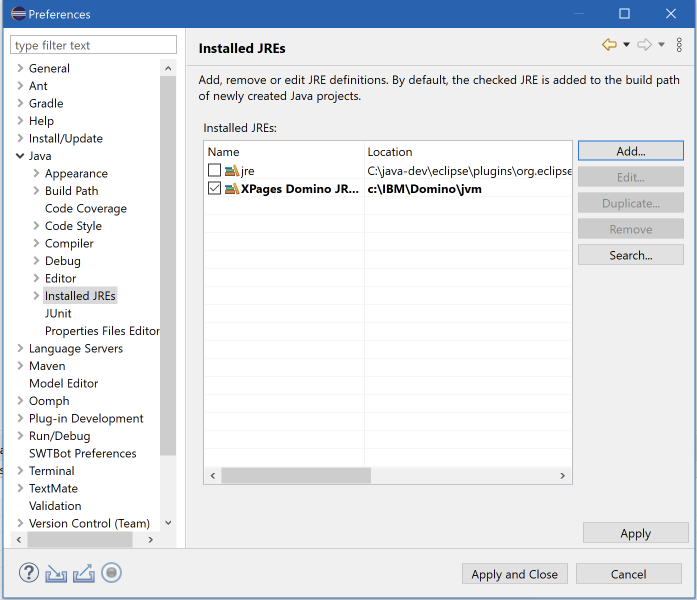
On the XPages SDK tab, check the paths of your local Domino & Notes install. Check “automatically create JRE for Domino”.
On the Java > Installed JRE screen, check if the new Domino JRE is selected. Eclipse will use this to compile code.
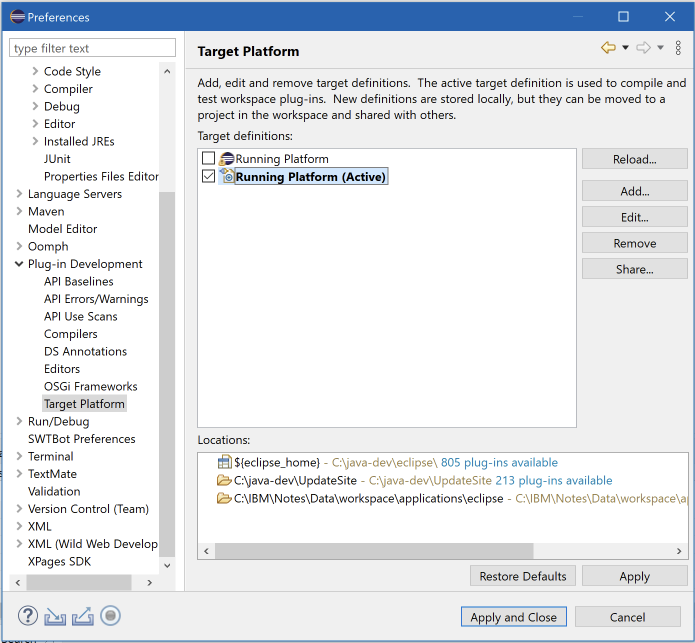
On the Plugin Development > Target Platform screen, there should be an entry that is checked and set to ‘Active’. The name doesn’t matter, but the locations do. If you select it you should see 3 locations in the bottom:
${eclipse_home} is added by Eclipse
C:\java-dev\UpdateSite is the folder where I created my p2 repository (see above)
C:\IBM\Notes\Data\workspace\applications\eclipse : folder in the local Notes install
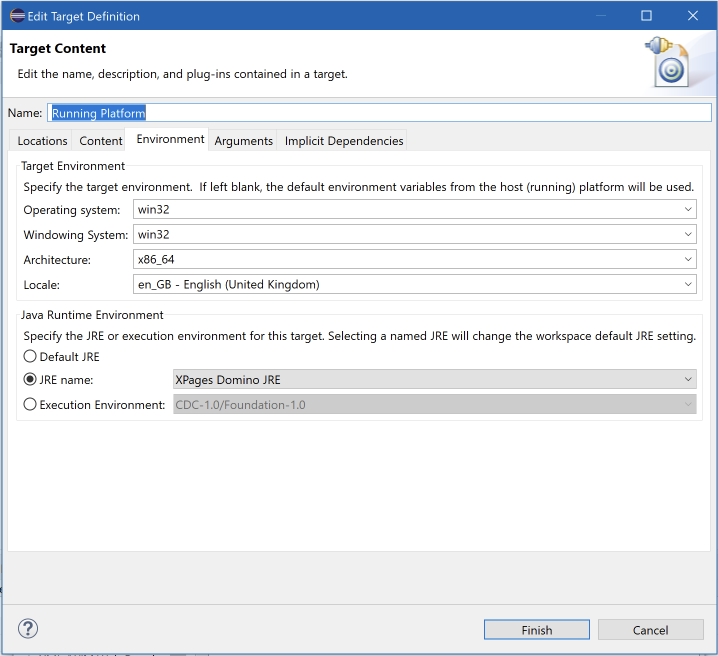
If you click ‘Edit’ you can add folders if any of the 3 above aren’t present. While you’re there, also make sure that on the Environment tab, the XPages Domino JRE is selected:
This completes my setup.
Next I created a fork from the org.openntf.domino repo in my Github account from https://github.com/OpenNTF/org.openntf.domino.git. I cloned the fork and switched to the latest commit for my Domino version (12.0.1). The project in Eclipse will show errors if the code is newer than your local Domino install (because that’s what the plugins in the p2 site is based on).
The projects in the cloned repo need to be imported into Eclipse. Click File > Import and choose Maven > Existing Maven Projects. Select the folder that contains the repo and import them into Eclipse.
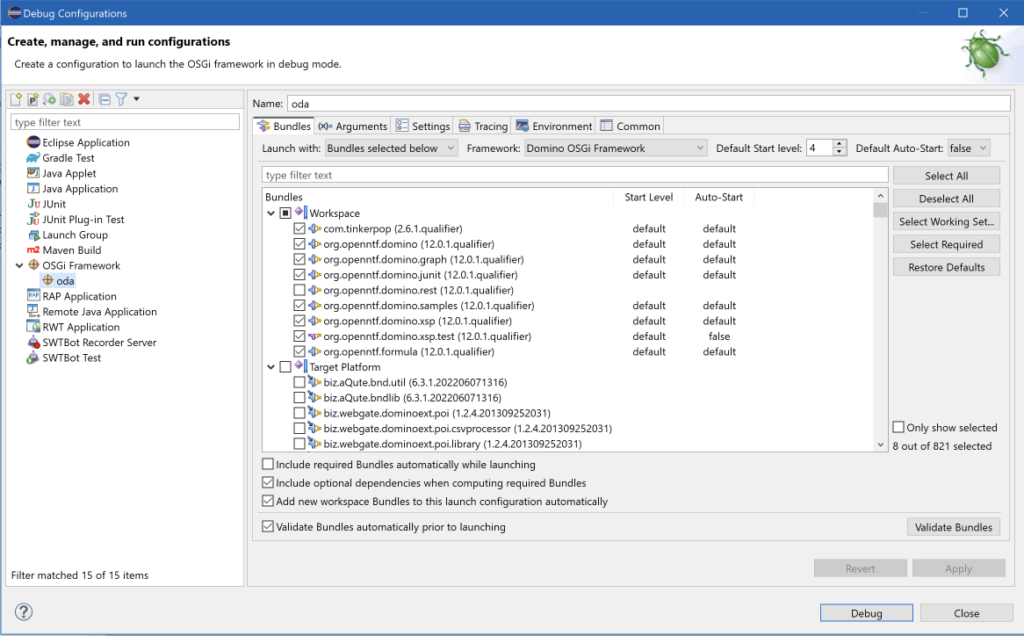
Now you’re ready to debug the code. Click the Debug icon in Eclipse and select “Debug Configurations”. Select “OSGI Framework” in the left hand list and click “New run configuration” (new icon at the top). Give it a name (in the screenshot below it’s ‘oda’). The screen will look like this:
Make sure that:
Default auto-start (top right) is set to false
Framework is set to “Domino OSGi framework”
In the bundles section, all items in the target platform are NOT selected, only the plugins from the Workspace are selected.
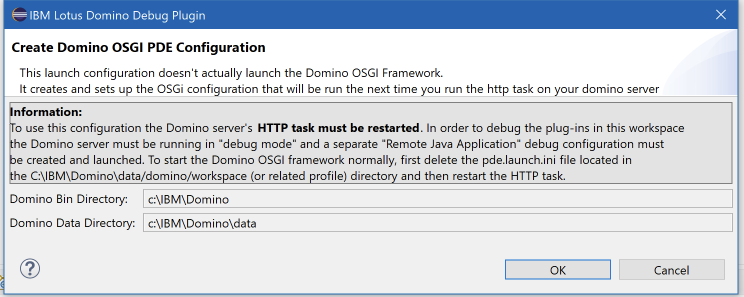
If you now click Debug, the XPages SDK will create a file named pde.launch.ini for you in your local Domino folder (<domino data>/domino/workspace). It will show you this dialog first:
Click ‘Ok’ to generate the file. Restart the HTTP task on Domino and the plugins will be loaded from the repo/ Eclipse instead of the update site database). You can work with the plugin. When you’re done, simply delete the ‘pde.launch.ini’ file and restart the HTTP task.
Oh and in case you’re wondering: the pull request for the issue is ready and merged in the project!
Do you remember? A little over 2 weeks ago was Engage. How quickly everything can change…
When you were at Engage you might have seen the session I did with Oliver Busse on DQL. The slides and demo code can be found here and here. We touched how to get started with DQL briefly, and based on the questions we received I think it’s a good idea to write a couple of articles on the topic. This is the first.
Fakenews
Let me start by explaining what you need to start using DQL: that would be a HCL/IBM Domino server, version 10 or higher. That’s it. No more. No AppDev pack. No Node.js.
Apparently this still confuses a lot of people. So what about that AppDev pack? Well you only need it if you want to talk to Domino from a Node.js server: the domino-db part is the part you need to install in your Node.js project. It also requires an extra component on the server called Proton. If you’re not interested in that yet and just want to write LotusScript/ Java, then you’re all set.
By the way: since Domino 11 the documentation is part of the standard server help and not available on the AppDev pack site anymore.
From a (vanilla) Domino v10+ server you can run your first DQL query with just a couple of lines of code in either LotusScript or Java: create an instance from the DominoQuery (NotesDominoQuery in LS) and query away!
In LotusScript:
Sub Initialize

Dim session As New NotesSession
Dim db As NotesDatabase
Dim dql As NotesDominoQuery
Dim col As NotesDocumentCollection
Dim doc As NotesDocument

Set db = session.Currentdatabase
Set dql = db.Createdominoquery()

Set col = dql.Execute("your query goes here")

Set doc = col.Getfirstdocument()

Do While Not doc Is Nothing

  ' do whatever you want

  Set doc = col.Getnextdocument(doc)
Loop

End Sub
Or Java:
Session session = ExtLibUtil.getCurrentSession();

Database db = session.getCurrentDatabase();
DominoQuery dql = db.createDominoQuery();
DocumentCollection result = dql.execute("your query here");

Document doc = result.getFirstDocument();

while (null != doc) {

  //do what you want with the doc

  Document tmp = dc.getNextDocument(doc);
  doc.recycle();
  doc = tmp;
}
Note that the result of executing a DQL query is an (unsorted) document collection. You can loop over it to get the information from the result set you need.
DQL Design Catalog
When you run the query above, the DQL engine will perform a scan of all the documents in your database. That’s because it doesn’t know yet what views it can use to optimise the query. For that it needs the so called Design Catalog. You can think of it as a summary of the elements in the design of your database that DQL might/ can use to optimise queries. Before version 11, this information was stored in a separate database (GQFdsgn.cat), but since version 11 it is stored in ‘hidden’ design elements in the NSF.
To create the design catalog you call load updall -e <your-db> or if you want to update it load updall -d <your -db>.
The design catalog isn’t automatically updated when the design changes, so you should take care of that yourself. It’s good to know that the design catalog can also be updated programmatically by calling setRebuildDesignCatalog() or setRefreshDesignCatalog(). You can also list all current indexes by calling listIndexes(). These are all Java methods, but the names in LotusScript are similar. You call them from an instance of the DominoQuery class.
If you don’t have a design catalog in your database, any query that needs it will throw an error (e.g. a view query):
Domino Query execution error: Entry not found in index - syntax error
Error validating view column name - ['contacts'.city] ..
invalid view name or database needs to be cataloged via updall -e
(Call hint: NSFDbGetNamedObjectID, Core call #0) ******************
DQL Exploring
HCL / IBM gave you the DQL Explorer application to play with DQL. But I think it’s overcomplicated for an introduction: it was written in React, which a lot people aren’t familiar with. I think this just adds to the confusion. So I wrote a simpler one as an XPages application: just 1 XPage with an input field to enter a query and a search button that call a Java method. The result is shown in a repeat control. You can try download it here or try it out:
From the XPage you can click one of the sample queries and try them out. Check the ‘Explain’ checkbox to get more details on how Domino executed the query (this is also a standard feature of the DQL engine: call the explain() method on your DominoQuery instance).
FYI: The demo app runs on a very basic VPS with 2 GB RAM that runs Domino 11 (so please be gentle). It queries a database with 100,000 fakenames, created using https://www.fakenamegenerator.com/. The fakenames database can also be downloaded from the link at the top of this post.
Enough for now, in the next articles I want to cover more search syntax, and approaches how to use search results in your app (e.g. REST) and sorting and paging of results.